Generate Facebook Lead Ads: Want to start generating leads on Facebook ads? In this post, we are showing you each step in detail for creating Facebook lead ad, inside of Facebook account without any third-party software required.
Facebook lead ads minimize the amount of collision with your audience because when you typically send people off-site from Facebook, to say third party landing page software. This will take approx 5 to 10 seconds to load the webpage. Which might create friction for users to access the web form.
Instead of doing this Facebook shows instant experience also its pre-populate the form with the information from that uses Facebook profile, basically, you can capture lead within 5 to 10 seconds, almost done, how easy is this.
Step by step Create Facebook Lead Ads Process
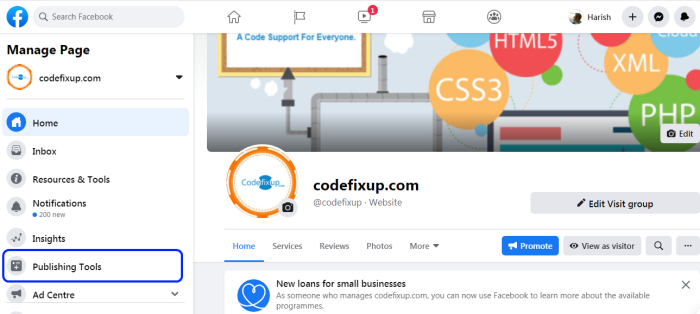
let’s go into your Facebook page on which you want to run ad campaign, then at the right side of page section, click on the publishing tools option.
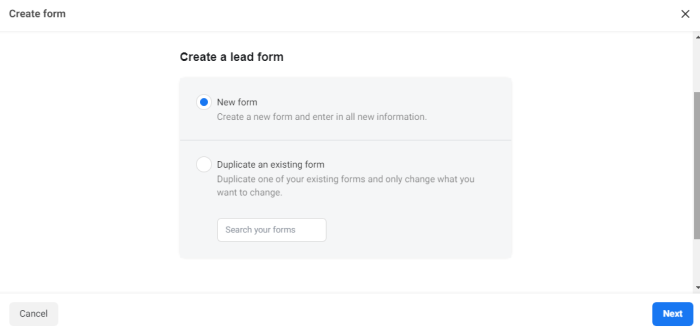
Now go down on the left and click on forms library inside, Click on create button at the right-hand corner. Now a pop up open, which shows options to create new form Or duplicate an existing form, pick new form option.
Now enter the lead ad form name, as we set ‘Test Facebook Lead Form’, you can name it anything to identify it.
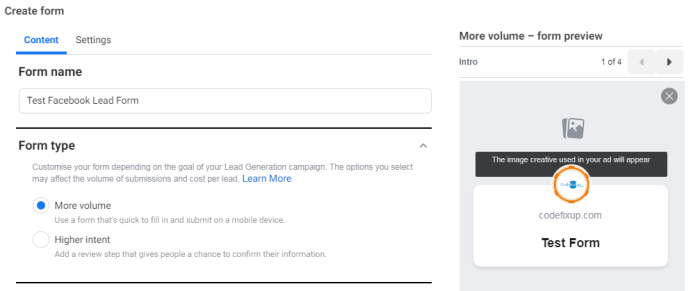
In form type, two options are showing, More volume and Higher intent.
More volume option, it’s really great to try to get as many leads as possible. If you need to drive high-quality leads and eventually high-quality sales, you would choose a higher intent option.
These options will affect your overarching return on ad spend and how successful your forms are generating leads. let’s just use more volume for the purposes of this example.
Now click on Intro section, here you can choose a background image, which shows behind of your lead form.
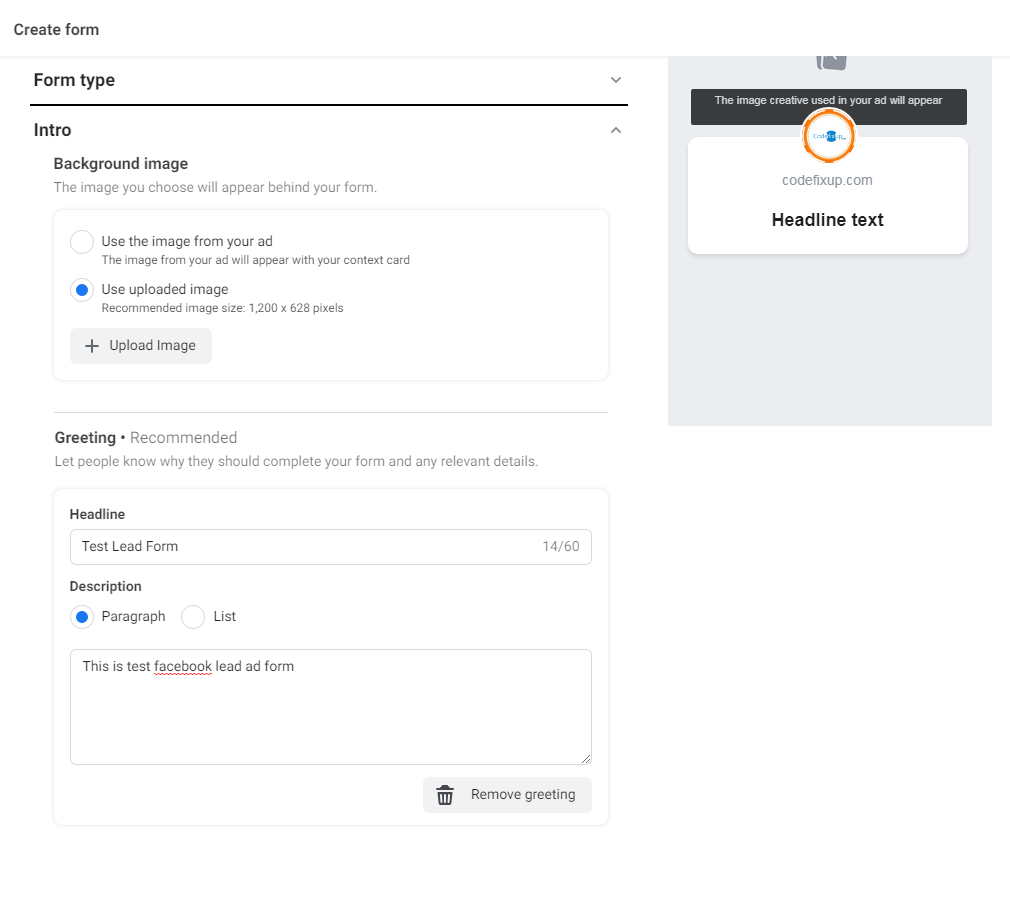
In the Greeting section, add a headline and relevant description about your Facebook lead form, so users know why they should complete your form.
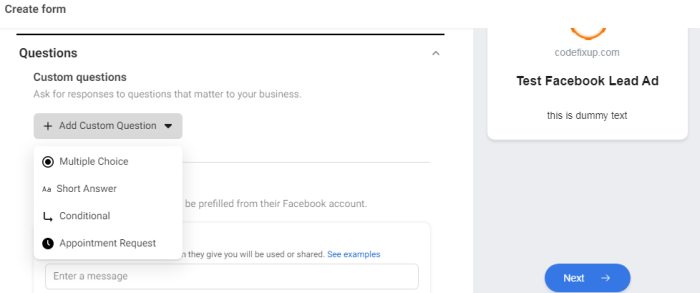
Next is the Question section, here you can add custom questions in your form, it can be Multitype choice, short answer, conditional, or appointment request type.
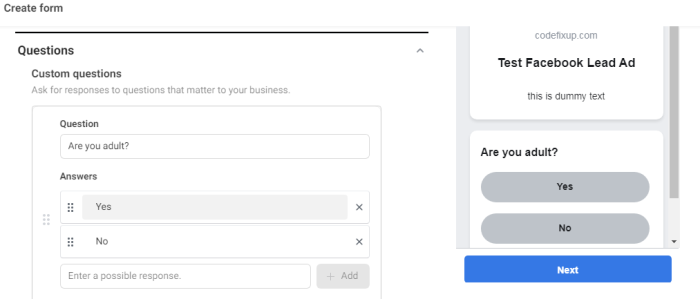
For example, we pick a Multitype custom question here, Ex. Are you adult?, with two options of Yes and No. You can add as many custom questions here as per your requirement.
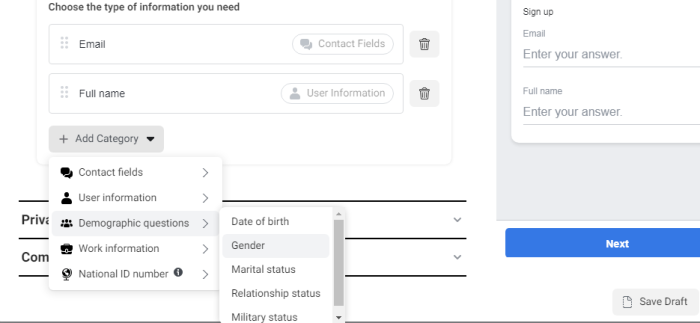
In prefill question information, generally, we capture user email and name, but there is plenty of option available like you can get user marital status, gender information etc.. many more contact field information available to choose. You can pick any category via ‘Add Category’ option in this section.
Next is the Privacy section, here you need to specify your privacy policy link, You are collecting user contact information, so you need to mention an link to your company’s privacy policy. This link will appear with Facebook’s default privacy disclaimer.
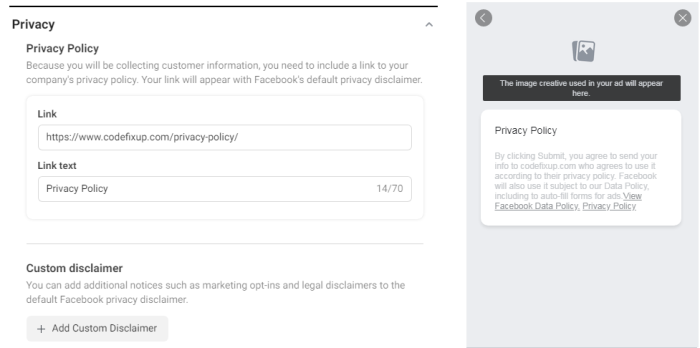
Here is a Custom disclaimer option available for additional information, which you didn’t mention in your company privacy policy page.
Next is the last Completion section, this belongs to your thank you screen. Add custom thank you message in the headline with a detail description text area.
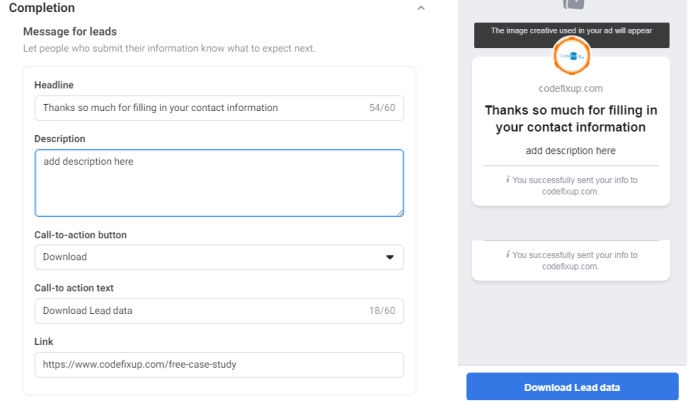
You can choose from three options for the call-to-action button: View Website, Download, or Call Business. And In the link box, input the web URL, where users can download the lead magnet.
You can also add tracking parameters in lead ad form, which help you identify where your leads come from, and tell about campaign identity. For this click on setting tab, above at create form pop up.
![]()
These fields would not appear in the live ad form, users only see when they submit a form, but you will be able to access these when your Facebook lead ads fetched via Webhook, API or configured CRM. These tracking fields helps to analyze submitted lead form data.
And then it’s as simple as going safe and the next step in this is a really important part exit out so before you click finish. A pop will generate to asking to close the lead form. Click OK.
You can now go into your draft forms library, you will see the form you just created.

Click on Edit next to the form and then double-check that everything you mentioned looks fine. Then click Finish.
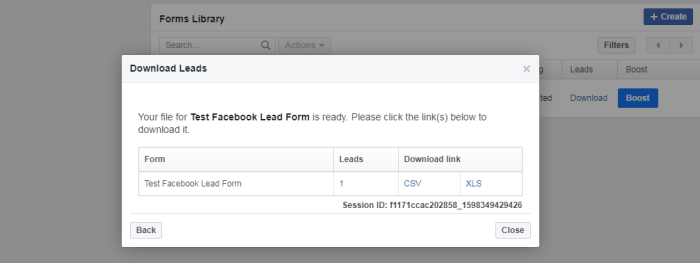
After this process, the completed form is available in the Form library.

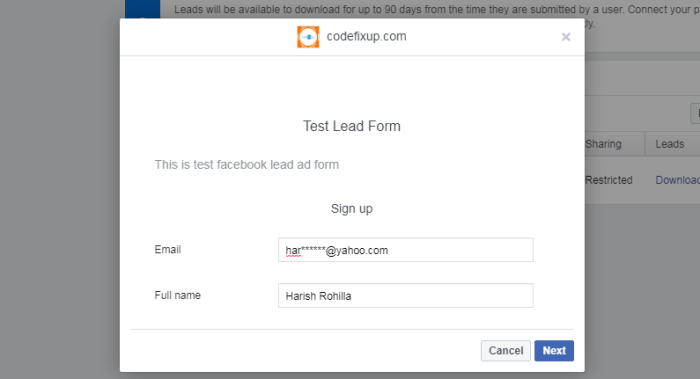
Here you can preview the Facebook lead ad form, as user can experience. Pre-populated form with placeholder user information will show, Users can also edit this prefill information. Click on the next button and submit it.
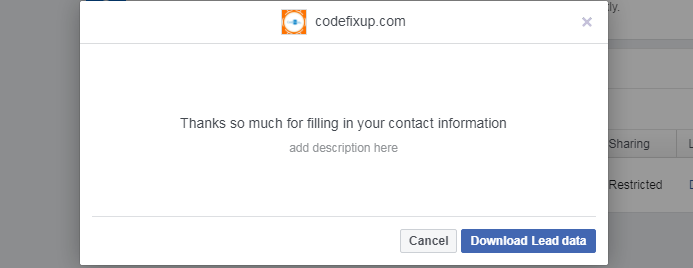
After submission Thank you page screen will show, with the Download lead data button option, this button link will redirect to the mentioned link, where users can see the case study.
Now your first Facebook lead ad form is all set and ready to capture the lead data.
Create Facebook Ad Campaign
Next, we are explaining to you, how to use Facebook lead form, so user can see it. For this, we need to start a Facebook Ad campaign. Let check it out the process
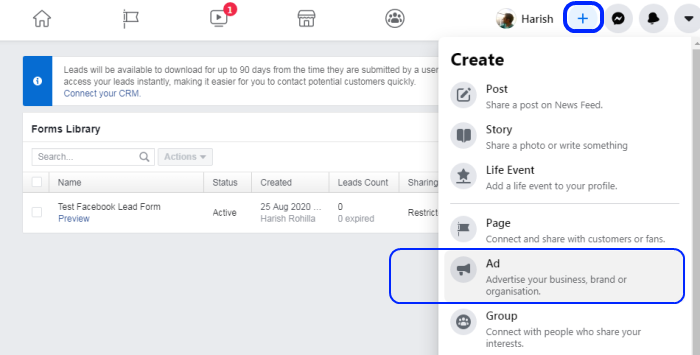
Click on + symbol above your Facebook page, to create a new ad campaign.
Next you need to choose an objective, for what purpose you want to use Facebook lead form. We have selected ‘Get More Lead’ option.

In the next step, by default, your created lead form is selected and all form details are showing on it. If you are creating lead ad first-time ad on Facebook Page, must review the lead ad terms and condition and select “I agree option”.

In the next step, you will see all options to customize your ad, you can choose the Button label, special ad category, choose the audience, ad duration, and budget etc.
Here you can also find the option to create a custom audience, in which you can specify the Gender, Age, Locations of the users to target an ad for specific types of users.
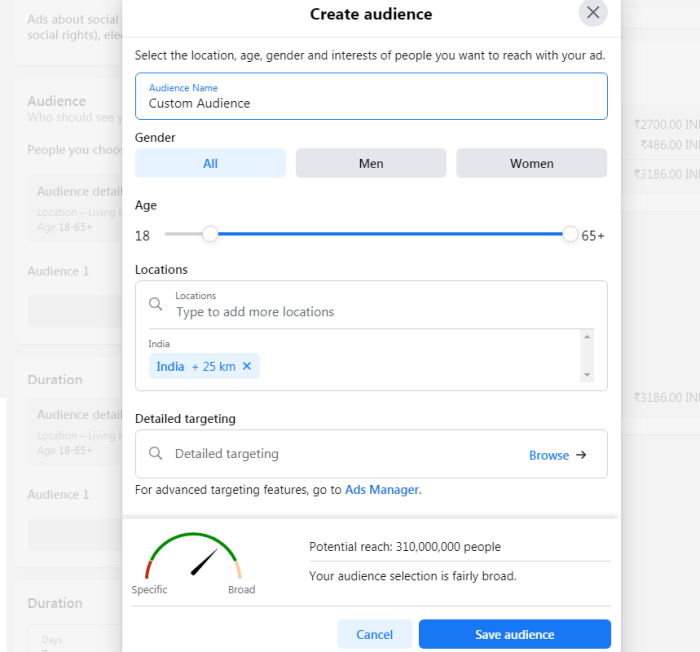
After saving the audience, set up the ad budget. That’s it, now your ad is ready to promote, make sure everything you setup is correct and submit the Promote Now button.
Download or Export Your Leads Data
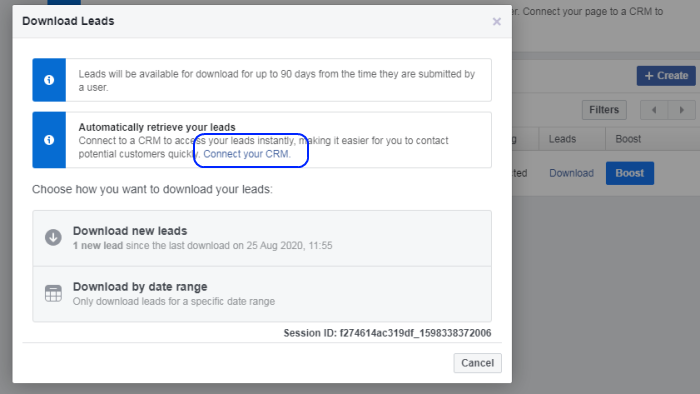
Under the Form library, you will find out the download leads button option. Here two options are showing first is ‘Download New lead’, using this you can export lead data in CSV and XLS file.
And another one is ‘Download by date-range’, which filter the lead data on the basis of the selected date range.
You can automatically retrieve these leads data in your CRM, for this Facebook provided an option to connect with your CRM. Via this, all the Facebook leads imported in your crm automatically. No need to fetch lead data manually.
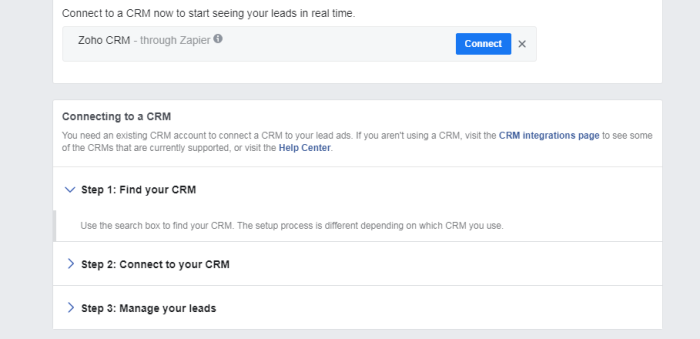
For this click on ‘Connect your CRM’ link, it will redirect to Lead setup page, where you can search the CRM and connect it with.
For example, we have selected Zoho CRM via zapier option, just authorize your account with it and you are good to go.
Conclusion
Facebook lead ads platform lets you generate leads inside without any third-party application support. This will provide you all required customization including custom questions and audience, which optimize your ad campaign. In today’s scenario, using this platform seems the best way to get more new customers.