
Learn How to Login with Google Account using PHP & MySQLi. If you are looking to implement social account login functionality for your web application like Login with Gmail account for your users. Then we bring out a simple tutorial for it.
We also published a tutorial to implement Login with the Facebook account using PHP.
For login with a Google account using PHP, google has oAuth API, which will provide access to users to login into web application via using their Gmail account credentials. Users don’t need to fill registration form they directly access the website after google account authentication.
By using this feature, you can get more subscribers to your website, because it is a fast process to log in. We also share you to manage user session data with Google account data via MySQLi database.
How to make Login with Google Account using PHP
Let’s start the process, we have explained all processes step by step.
First, you need to create a Google Project to access Google Oauth API. Follow the below steps.
Steps to Create Google API Console Project
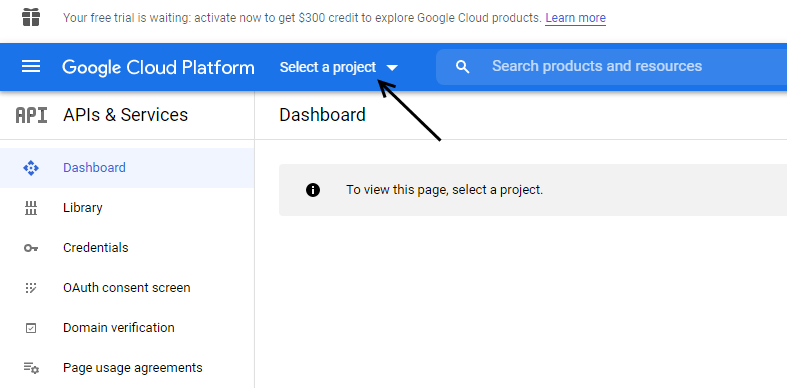
Step 1: Open the Google API Console.
Step 2: Click on the ‘Select a project’ option as shown below the image.
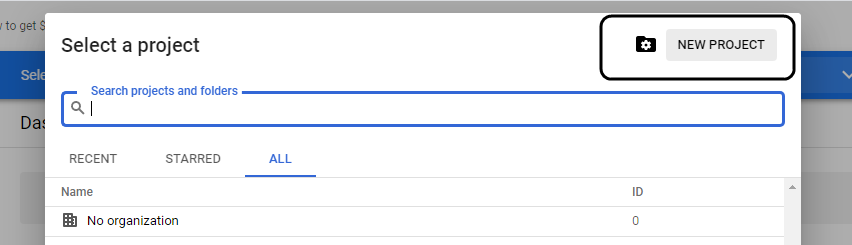
Step 3: Now, you can either search for previously created projects Or click on ‘New Project’ option to create a new project.
After this, enter your project name page, you will see the Google automatically creates a project name ID. You can edit this name but it must be unique worldwide.
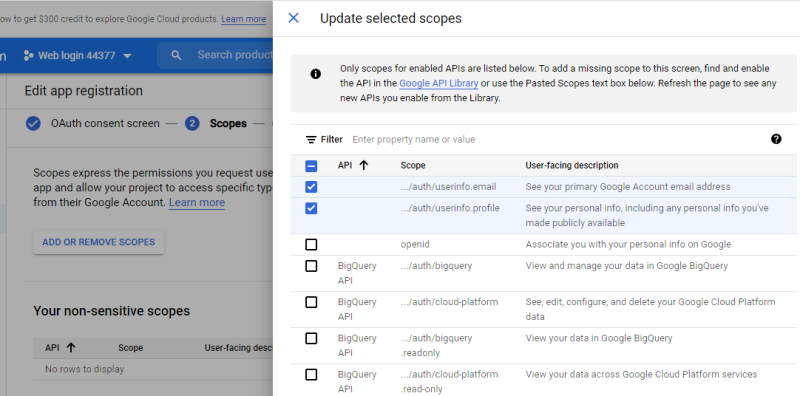
Step 4: Then click on ‘OAuth consent screen‘ option and choose user type as per your requirement.

Here specify application name, support email id, authorized domains and click to save. Follow all steps here like choose scope as showing in the below image.
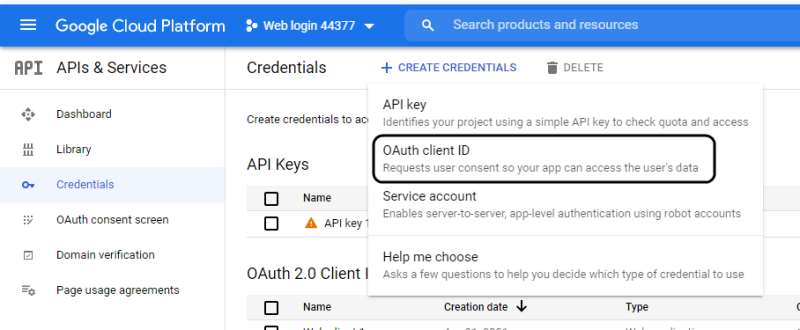
Step 5: Now, on the left side panel, click on the Credential option.
Now click on ‘+ CREATE CREDENTIAL’ option, it will ask you to choose what type of credential you need to create.
Choose the ‘OAuth Client ID’ option here.
Step 6: After this, choose your Application type ‘Web application’. It depends upon where you want to implement Login with Google functionality. Choose an appropriate option as per your requirement.
Under the Authorized redirect URLs section, you need to fill a callback URL of your domain. Like we have used for our web application:
Example Redirect Url: https://www.yourDomain.com/auth.php
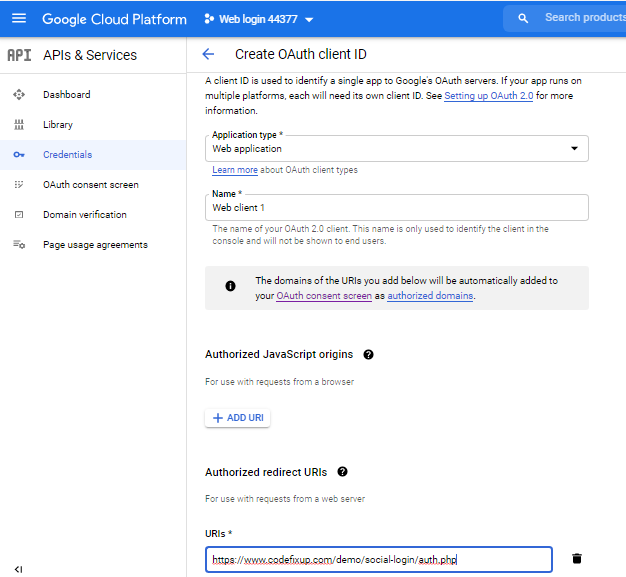
This URL will use to send google API code and fetch the user profile data.
Now your Client Id for the web application is created successfully. Note down your Client ID and Client Secret Key for further configuration use on your web application.
Install the Google PHP SDK Client Library
We are going to implement Login with Google account functionality via configure Google PHP SDK Client Library on a web server.
You can configure this library in two possible ways.
Via Composer:
Install this library via composer, use below command
$composer require google/apiclient:”^2.0″
Download and upload the library files manually
Visit the Google official API page and download the latest version of the client library.
In our example, we have manually uploaded the Google PHP Client library on the web application server.
Use Library for Login with Google Account Feature:
Script Files
- auth.php
- index.php
- database.php
- session.php
- logout.php
First, create an auth.php file that will handle the Google API code and get the user profile information. Recall, we have put a redirect URL in Google Client Project https://www.yourDomain.com/auth.php. Now we create an auth.php file.
This auth.php file includes Google PHP Client vendor autoload.php file. This will ensure that the classes we use in our script are autoloaded.
Put your Google Client ID, Client Secret key, and Redirect URL in this PHP script.
auth.php
|
1 2 3 4 5 6 7 8 9 10 11 12 13 14 15 16 17 18 19 20 21 22 23 24 25 26 27 28 29 30 |
<?php require_once './google-api-php-client/vendor/autoload.php'; // init configuration $clientID = '91652111058-********************dfund.apps.googleusercontent.com'; $clientSecret = 'W5V***************ZRUgz'; $redirectUri = 'https://www.yourDomain.com/auth.php'; // create Client Request to access Google API $client = new Google_Client(); $client->setClientId($clientID); $client->setClientSecret($clientSecret); $client->setRedirectUri($redirectUri); $client->addScope("email"); $client->addScope("profile"); // authenticate code from Google OAuth Flow if (isset($_GET['code'])) { $token = $client->fetchAccessTokenWithAuthCode($_GET['code']); $client->setAccessToken($token['access_token']); // get profile info $google_oauth = new Google_Service_Oauth2($client); $google_account_info = $google_oauth->userinfo->get(); $google_account_info->email; $google_account_info->name; $google_account_info->id; ?> |
Now create an index.php file for login with Gmail account button. Copy the below code and use it.
index.php
|
1 2 3 4 5 6 7 8 9 10 11 12 13 14 15 16 17 18 19 20 |
<?php require_once './google-api-php-client/vendor/autoload.php'; // init configuration $clientID = '91652111**************************.apps.googleusercontent.com'; $clientSecret = 'W5Vt7w******************Ugz'; $redirectUri = 'https://www.yourDomain.com/auth.php'; // create Client Request to access Google API $client = new Google_Client(); $client->setClientId($clientID); $client->setClientSecret($clientSecret); $client->setRedirectUri($redirectUri); $client->addScope("email"); $client->addScope("profile"); echo "<a href='".$client->createAuthUrl()."' class='btn btn-primary'>Login with Google</a>"; ?> |
In this index.php file, we have pointed to google client auth URL function $client->createAuthUrl().
This will generate an authentication code for the auth.php file.
By this only these steps, you can see that the user can able to authenticate his google account after clicking on Login with Google button and his profile information shows on the auth.php file using the below code lines.
|
1 2 3 |
$google_account_info->email; $google_account_info->name; $google_account_info->id; |
Now we create a database.php file to connect with MySQLi database.
database.php
|
1 2 3 4 5 6 7 8 9 10 11 12 13 |
<?php $servername = 'localhost'; $username = 'USERNAME'; $password = 'PASSWORD'; $db = 'DATABASE NAME'; $conn = mysqli_connect($servername,$username,$password,$db) ; if (!$conn) { echo "Failed to connect to MySQL: " . mysqli_connect_error(); } ?> |
Copy and paste below MySQLi query code to create a database table to store users’ data.
|
1 2 3 4 5 6 |
CREATE TABLE IF NOT EXISTS `registered_users` ( `id` int(11) NOT NULL AUTO_INCREMENT, `google_id` varchar(255) NOT NULL, `name` varchar(255) NOT NULL, `email` varchar(255) NOT NULL, PRIMARY KEY (`id`) |
Now create a session using Gmail User profile information.
As we told you, in auth.php, we get the user’s Google ID, Name, and Email information after authentication.
Now we going to use those values to set session variables. You need to put the below code in the auth.php file after getting user profile information.
|
1 2 3 4 5 6 7 8 9 10 11 12 13 14 15 16 17 18 19 20 21 22 23 24 25 26 27 28 29 30 31 |
function checkuser($conn, $google_id, $username, $email) { $sql1 = "select * from registered_users where google_id='$google_id'"; $check = mysqli_query($conn,$sql1); $checkdta = mysqli_num_rows($check); if(empty($checkdta)) { // New user Insertion $query = "INSERT INTO registered_users (google_id,name,email) VALUES ('$google_id','$username','$email')"; mysqli_query($conn,$query); mysqli_error($query); } else { // Returned user data update $queryupdate = "UPDATE registered_users SET name='$username', email='$email' where google_id='$google_id'"; mysqli_query($conn,$queryupdate); mysqli_error($query); } } // session part $_SESSION['google_id'] = $google_account_info->id; $_SESSION['user_name'] = $google_account_info->name; $_SESSION['email'] = $google_account_info->email; checkuser($conn, $_SESSION['google_id'], $_SESSION['user_name'], $_SESSION['email']); /* ---- Redirection location after session ----*/ header("Location: session.php"); |
In the above code, we have to store the user’s data in session variables and created a checkuser() function, which checks that the user data already inserted in the database table or not.
Now create a session.php file to check session is created or not and show display user’s information on web page.
session.php
|
1 2 3 4 5 6 7 8 9 10 11 12 13 14 15 16 17 18 19 20 21 22 23 24 25 26 27 28 29 30 31 32 33 34 35 36 37 38 39 |
<?php session_start(); if(!isset($_SESSION['google_id'])) { header("Location: index.php"); exit(); } else { ?> <html> <head> <title>Welcome Page</title> <link rel="stylesheet" href="https://maxcdn.bootstrapcdn.com/bootstrap/3.3.7/css/bootstrap.min.css"> </head> <body> <div class="container" style="margin-top:20px;"> <div style="margin-top:20px;" class="mainbox col-md-6 col-md-offset-3 col-sm-8 col-sm-offset-2"> <div class="panel panel-info" > <div align="center" style="padding-top:30px" class="panel-body" > <h3 class="text-center" >Welcome, <?php echo $_SESSION['user_name']; ?></h3> <p>Google Id: <?php echo $_SESSION['google_id']; ?></p> <p>Email: <?php echo $_SESSION['email']; ?></p> <p><a href="logout.php">Logout</a></p> </div> </div> </div> </div> </body> </html> <?php } ?> |
To destroy the user session, we need to create a logout.php file. In this, we unset all session data and redirect it back to the user on the login page.
logout.php
|
1 2 3 4 5 6 7 |
<?php session_start(); unset($_SESSION["google_id"]); unset($_SESSION["user_name"]); unset($_SESSION["email"]); header("Location:index.php"); ?> |
Conclusion:
By following these steps you can easily implement the Login with Google Account feature on your website. This will bring more subscribers, users don’t need to sign up, they directly logged in via a Google account.
LIVE DEMO | Download Social Login Script